Red Velvet Pound Cake With Cream Cheese Glaze Recipe
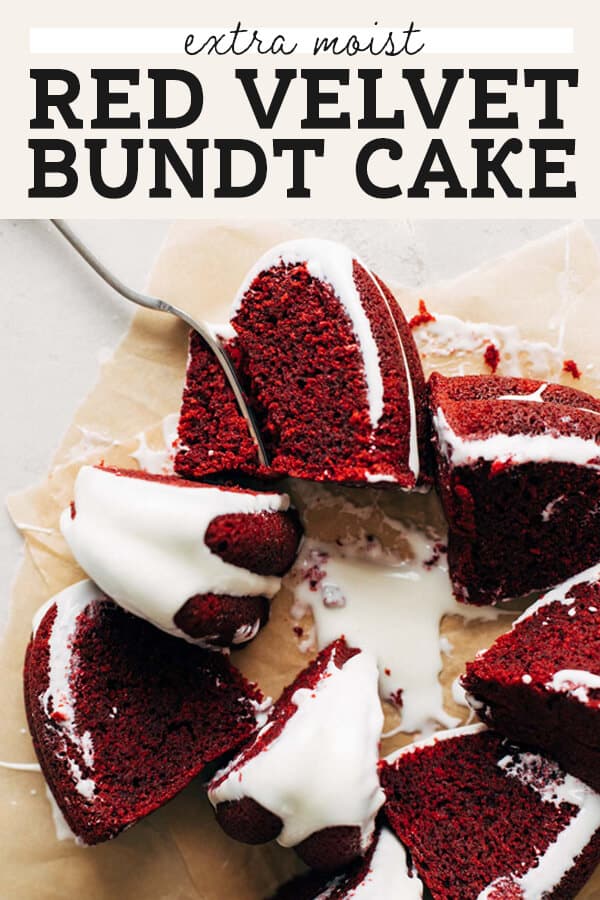
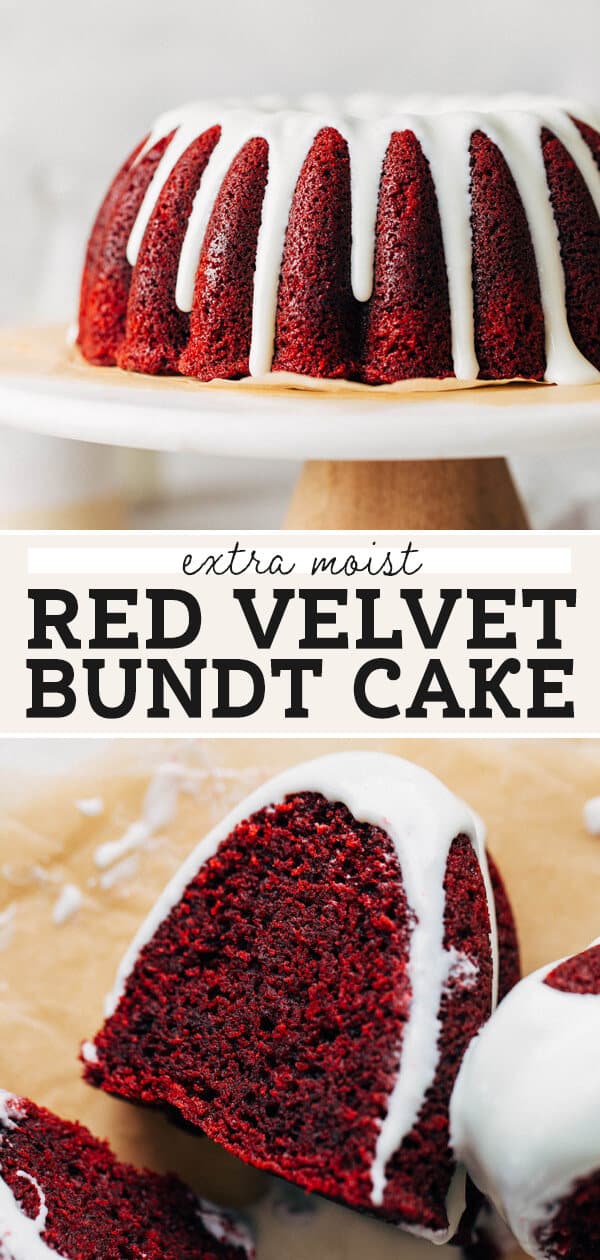
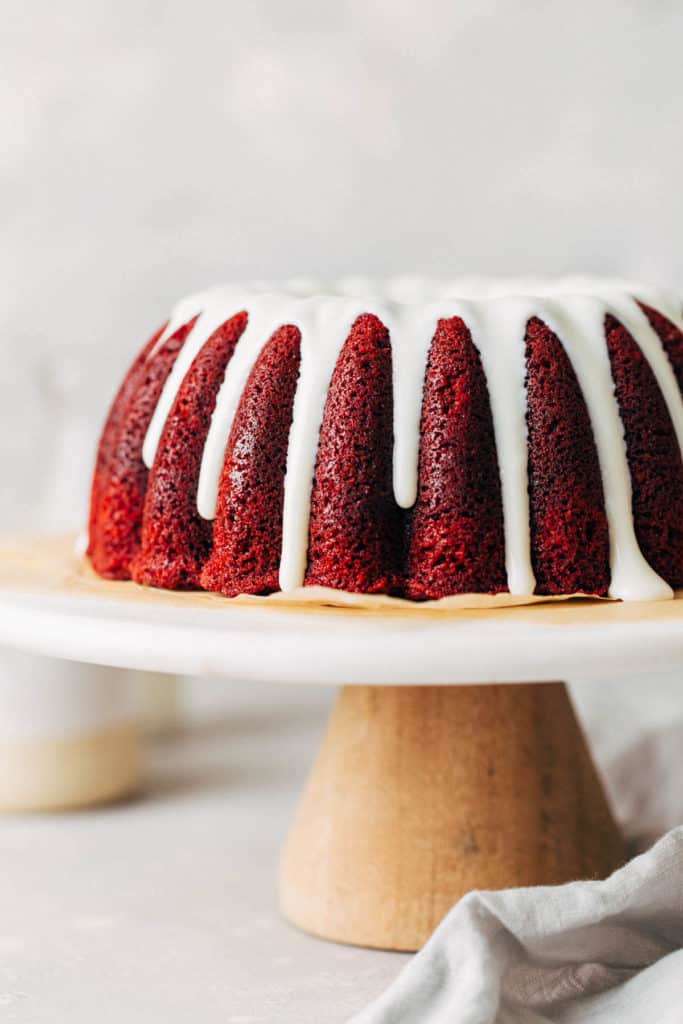
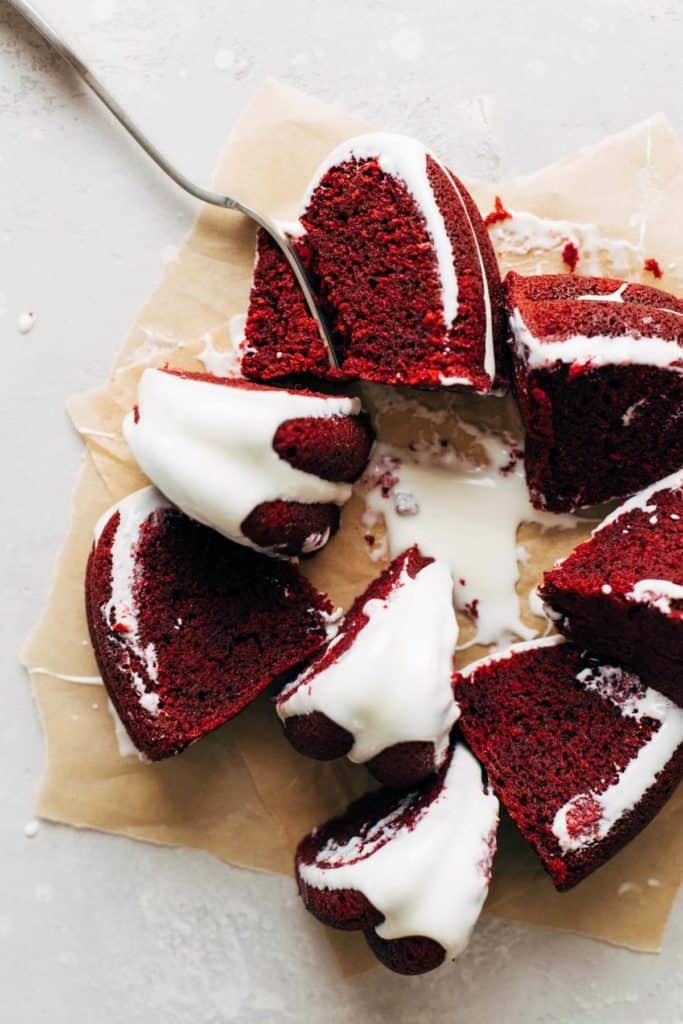
This red velvet bundt cake is so moist and effortless, but looks and tastes so amazing! The texture is rich and tender, the flavor has that signature hint of chocolate, and the color is the perfect shade of deep red velvet. The cake is delicious on its own, but I've enhanced this recipe by adding a silky cream cheese icing on top. You just can't go wrong with red velvet and cream cheese!
What is red velvet cake?
You can never quite put your finger on it. It's a red cake that doesn't quite taste like chocolate or vanilla and sometimes feels like it's just a carrier from cream cheese toppings. I'm not even sure anyone can describe the exact flavor of it!
Historically, it was invented in the Victorian era. It was named a "velvet" cake because of its creamy and dense chocolate cake-like texture.
To achieve this texture, buttermilk and vinegar are two very common ingredients in red velvet cake. Once added to the batter, the two activate the baking soda to create a fluffy but "velvety" texture. And when the cake was first created, the cocoa powder used wasn't alkalized, so it would give the cake a reddish hue when combined with these ingredients.
So with the hint of cocoa and acidity, you're left with a slightly chocolatey, tangy, and silky red cake. While no one can pinpoint the exact origin of red velvet cake, we're all in agreement that it's a REALLY good cake that just never fails.
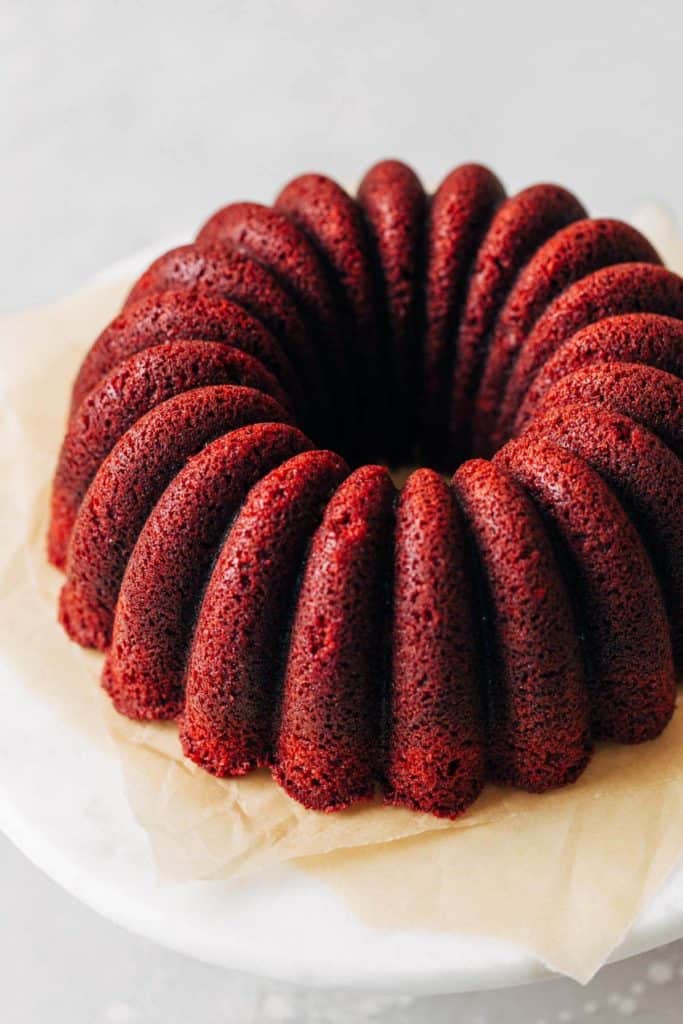
How to make an incredibly moist red velvet bundt cake
I know, I said it…moist. But this really is a super moist red velvet bundt cake OK! It took me four tests to get the recipe just right so you know it's worth the "m" word.
Most cake recipes either use all butter or all oil. When I first made this recipe, I just used oil and boy did I get one oily cake. You would push your finger into it and you would be left with a pool of oil. No thank you.
The reason this is a super moist red velvet cake is because of the balance between the oil and the butter. Adding oil to a recipe helps it stay moist for a longer period of time. This is because, as opposed to butter, it lacks water so it won't evaporate and dry out your cake.
But, using all oil can be messy and create a strange flavor…even with a mild oil like vegetable or canola. The butter helps to bring the flavor back down while also giving the cake a little bit more structure once cooled.
Of course, it wouldn't be a red velvet cake without buttermilk and vinegar. Like I just mentioned, the two in conjunction with baking soda help to give this fluffy but silky texture to your cake. Mix that with the perfect balance of fats and you have the best red velvet cake recipe ever!

The best food coloring to use in red velvet cake
To get that signature red velvet color, 2 tablespoons of red food dye are added to the batter. For red velvet cakes, I choose to use a liquid red food dye that you can find in just about any grocery store. It easily blends into the batter without creating an overly vibrant red color.
I would stay away from using gel food coloring as it has a much stronger opacity than liquid food color. It's very easy to go overboard with the red color when using gel. Although in any other case, I choose to use gel when I only need a few drops to color things such as cookies or frosting.
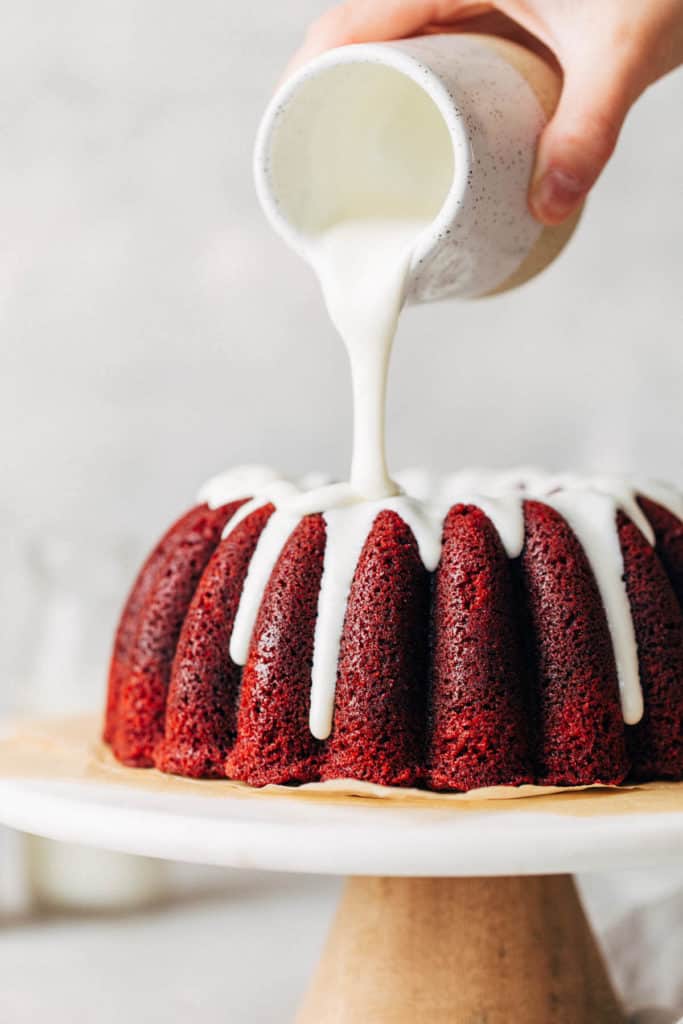
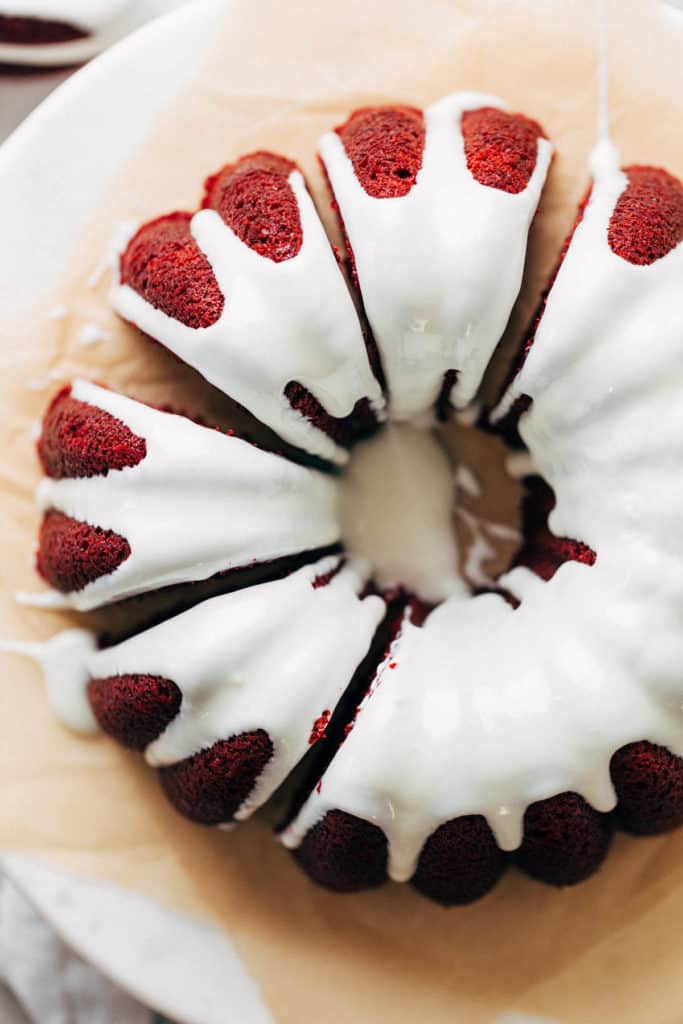
Tips for making a perfect cream cheese icing
The icing on top is absolute perfection. It's creamy, silky, tangy, and the perfect pairing to the moist and rich red velvet cake. Here are a few things to keep in mind when making the glaze:
- Make sure the cream cheese is softened to room temp before use. Otherwise, you'll be left with a lumpy glaze that looks more like cottage cheese.
- You can choose to mix it by hand or with an electric mixer. If mixing by hand, start out with a fork and mash the cream cheese smooth. Then mix in 1 cup of powdered sugar along with 1 tablespoon of milk. Continue to mix and mash with a fork until you've reached a thinner consistency. Then switch to a whisk to smooth out the icing.
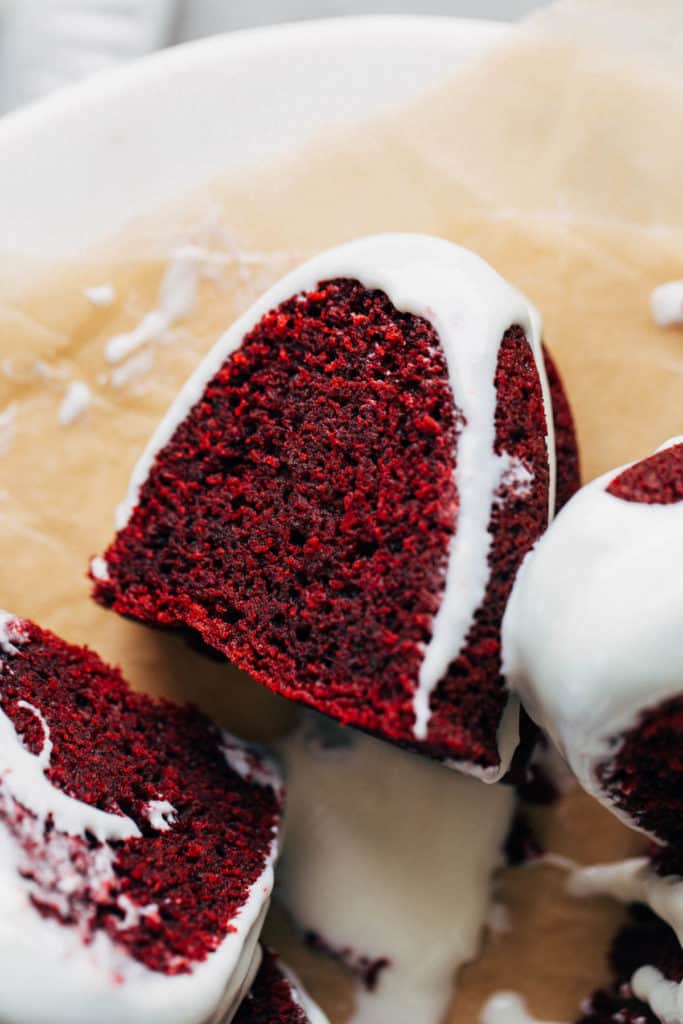
- The fluidity of the icing must be just right in order to get those creamy drips down the sides of the cake. You're looking for a consistency that's just a hair thinner than craft glue. When you lift the whisk out of the bowl, it should fall back in a solid stream and then slowly disappear back into the bowl. If it's too thick, add 1/2 tablespoon of milk at a time until it's just right. If it's too thin, do the same but with 1-2 tablespoons of powdered sugar at a time.
How to prevent your bundt cakes from sticking
I've had so much trouble with this intricate bundt cake pan, especially with really moist and sweet cakes. But through some trial and error, I've found a few solutions that give me the perfect release every time.
Option 1: Right before you're about to pour the batter into the pan, prep it with a nonstick oil and flour spray. My favorite is Baker's Joy. But the key here is to spray in short strokes, careful not to let the oil pool in the bottom of the pan. Once you have a light coating, use a fine pastry brush to brush the oil all around the pan, getting every nook and cranny. Then pour in the batter and bake.
When it's fresh from the oven, set a timer for 10 minutes. This time is the sweet spot because it allows the cake to cool just enough to where it won't fall apart, but it's also when the sugars are still fluid and liquid. If you let the cake cool too long, those sugars will harden and your cake will stick to the pan. But after those 10 minutes, the cake should pop right out.
Option 2: Again, prep the pan right before you pour in the batter. But this time, generously grease the pan with oat and then coat it in granulated sugar. The sugar acts as a barrier between the cake and the pan, and it also adds a sweet little crunch to the outside of the cake.
Once baked, let your cake cool for that 10 minute sweet spot. The key is to turn it out while it's still a little warm. Otherwise, if you let it cool completely, the sugar will harden and then your cake is really stuck.
Your cake should pop right out. No wiggling needed. So if you've ever really struggled with your cakes sticking, try this trick!
For more delicious bundt cake recipes, check out my:
- Chocolate Peppermint Bundt Cake
- Butterscotch Pumpkin Bundt Cake
- Apple Cider Bundt Cake
Make sure to tag me @butternutbakery on Instagram and comment below if you make this Red Velvet Bundt Cake. To pin this recipe and save it for later, you can use the button on the recipe card or on any of the photos above. Happy baking!
Description
This is the BEST red velvet bundt cake recipe! It's incredibly moist and coated in a silky cream cheese glaze.
Red Velvet Cake
- 3/4 cup (160g) canola or vegetable oil
- 1/2 cup (110g) unsalted butter, melted
- 2 cups (400g) granulated sugar
- 2 large eggs
- 1 cup (240ml) buttermilk*
- 2 tsp vanilla extract
- 1 tsp white vinegar
- 2 tbsp red food coloring
- 2 1/2 cups (300g) all purpose flour **see notes for GF option
- 3 tbsp unsweetened cocoa powder
- 1 tsp baking soda
- 1 tsp salt
Cream Cheese Glaze
- 4 oz cream cheese, room temp
- 2 cups (240g) powdered sugar
- 3 tbsp milk
- 1/2 tsp vanilla extract
Red Velvet Cake
- Preheat your oven to 350F and set out your bundt pan but don't touch it just yet. For this recipe, you can use either a 10 cup or 12 cup bundt pan.
- Whisk together your dry ingredients (flour, cocoa powder, baking soda, and salt) and set aside.
- In a large bowl, whisk together the oil, butter, and sugar. You can do so by hand or with an electric mixer with the whisk attachment. Mix for a good 1-2 minutes on medium speed until well combined.
- Whisk in your eggs and then the buttermilk, vanilla, and vinegar. Finally, mix in the food coloring.
- Add half of the dry ingredients and mix to combine. Then scrape down the bowl and mix in the other half. If mixing by hand, switch to a rubber spatula and fold in half of your dry ingredients until almost combined. Fold in the rest until smooth.
- Now, prepare your bundt pan. You can either use the sugar or flour method (both detailed in this blog post). The flour method is the quickest and easiest, so give your pan a light coat of an oil and flour nonstick spray (like Bakery's Joy) and then use a fine pastry brush to spread it around the entire pan, getting it into all the nooks and crannies.
- Then pour in your batter. If you're using a 12 cup bundt pan, you'll use all of the batter. If you're using a 10 cup bundt pan (like the one I used here), leave out about 1 cup of batter otherwise it will overflow when baked.
- Bake for 45 minutes if using a 10 cup pan, or 50-60 minutes if using a 12 cup pan.
- Let it rest for about 10 minutes, then turn it out onto a cooling rack and let it sit for another 30 minutes to cool completely.
Cream Cheese Glaze
- Mix together the cream cheese and powdered sugar, adding the milk as you go.
- Once smooth, mix in the vanilla. The consistency should be a bit thinner than craft glue (see image in post for reference). If it's too thick, add 1/2 tbsp of milk at a time until smoothed. If too thin, add 1 tbsp of powdered sugar at a time until thickened.
- Pour over your cooled bundt cake and serve! Store in the refrigerator for up to 5 days.
Notes
*BUTTERMILK – You can also make your own buttermilk with milk and vinegar. Measure out 1 cup of milk and then take away one tablespoon. Then add one tablespoon of vinegar and mix to combine. Let it sit for 10 minutes to curdle. (And yes, keep the separate 1 tsp of vinegar in the recipe).
**GLUTEN FREE – Although I haven't tested it, I believe this cake would do well with gluten free flour. Sub the flour with a good quality gluten free baking flour. I like Bob's Red Mill 1-to-1 gluten free baking flour. I also suggest weighing the flour, rather than measuring by cups, to ensure accuracy.
- Prep Time: 25 minutes
- Cook Time: 45 minutes
Keywords: red velvet bundt cake, red velvet cake
Recipe Card powered by
*Some of the links above are affiliate links, which pay me a small commission for my referral at no extra cost to you!
Red Velvet Pound Cake With Cream Cheese Glaze Recipe
Source: https://butternutbakeryblog.com/red-velvet-bundt-cake/